As simple as it is in practice, if you have no clue, you’re likely to sweat off only thinking about how to change the hood strut on a Lexus ES 330 – especially if you’re one to play with tools and are interested in doing it DIY style.
There’s no need for the sweat, though: this article will put you through the process and, importantly, inspire the confidence to make you think (and feel) like a professional, right after you finish reading.
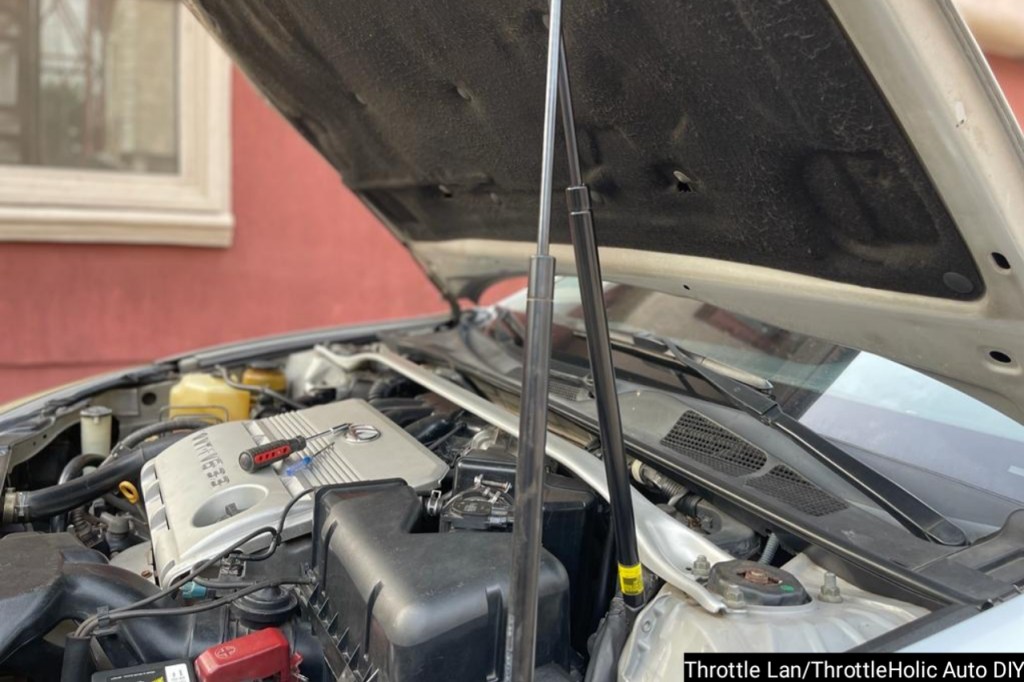
Mostly pressurized with gas that helps keep the weight of the hood in a near-vertical position when opened (so that checks and repairs can be carried out in the engine bay area), the hood strut lives a hard life and, like the suspension struts, eventually gives way and needs to be replaced.
On the Lexus ES 330, this is not quite often, though – all thanks to Toyota’s exceptional build quality.
However, after about 150,000 miles, it’s not uncommon to see these struts fail, especially if the vehicles they are fitted on experience frequent opening and closing of the hood (like it’s common with the car of a determined DIYer).
This article focuses on the signs of a failing hood strut (or struts), why these struts fail in the first place, the tools for changing the struts when they eventually fail, and finally, how to take on the procedure and come out like a champ – feeling great after all is said and done.
The procedure outlined here was carried out on a 2006 Lexus ES 330, with only one hood strut. However, the process will be identical on the Avalon, Solara, and Camry of similar years (and even older or newer models).
Beyond the Toyota/Lexus marque, the process will also be similar (albeit with little model-specific variations) on most imports, especially options from Asia.
Finally, for the visually inclined, a video is worth a billion words (a photo is just a thousand, remember?) Accordingly, there’s a video of the entire process, shot and narrated by yours truly, right before this article comes to a close.
Affiliate Disclosure
I’m a participant in the Amazon Services LLC Associates Program. As an Amazon Associate, I earn from qualifying purchases by linking to Amazon.
Table of Contents

Signs It’s Time to Change the Hood Strut(s)
Like most parts on an automobile, hood struts don’t just fail. When their time with you is up, they first give you ample indications that they are done with being part of your motoring reality.
When these signs begin to manifest (whether or not you have the single strut system, like the ES 330, or the dual strut system, like the ES 350), it’s best to begin to think about a replacement and set aside a budget for the same.
And, if you’re thinking they can be refilled and reused, the answer is that it doesn’t make financial sense. The unit is so inexpensive that it doesn’t make sense to try to fix it. When they fail, simply discard them (properly, of course) and get a replacement.
So, here are the telltale signs you’ll soon be missing your old hood strut(s) sooner than later.
1. A Hood Strut That Stays in Place (Only) with Help
The first sign of a hood strut that needs to be changed (or a set of hood struts that need to be replaced ASAP) is when, after opening the hood, you see that you need to physically support it in place, or it’s going to come crashing down.
Struts that are on their way out will need help staying in place. This is occasioned by the loss of the pressure in them, pressure that must be right for them to function as designed.
Hood struts that are rightly pressurized simply hold better and are firmer in the hand, too, either when opening or when closing the hood.
If you’re paying attention, however, the effect will be more in the attempt at holding the hood in a near-vertical position (this is when the strut(s) work the hardest to achieve their prime objective).
2. Hood Struts That Won’t Go All the Way Up When Left Halfway
The second sign of a hood strut (or hood struts) in need of replacement is a hood strut (or struts) that won’t go all the way up when left halfway opened.
Powered by gas under pressure and sealed shut by a seal, the constant pressure in the narrow cylinder of the struts easily pushes the strut(s) up to the full extent allowable by the strut design when opened and left halfway.
If you notice that you need to open your hood all the way up before it stays in place, this is a clear indication of the beginning of the loss of pressure in the little cylinder of the struts and a call for replacement, sooner rather than later.
The good thing about this test is that it can easily be executed and conclusions reached by even a complete newbie to the automotive world or the paradise that is DIY.
3. Hood Struts That Fail and Then, Work Again
Finally, hood struts that appear to fail, work, and then for some unexplainable reason, fail again should be prime replacement candidates and considered due for replacement as soon as it’s practical.
My experience with – and resulting theory of this sort of erratic behavior is that when warm, the failing seal ‘rejuvenates’ itself sort of and the less than-pressurized gas takes some sort of ‘boost’ from the heat and then attempts to behave as though all is well (‘basic thinking’, I know. This is simply what I experienced and haven’t bothered too much with thinking about it).
This is especially true with a hot engine from a long trip when the entire bay is properly basked in engine heat.
Be wary of such sudden sorting of themselves, however: I’ve had a hood strut come on my head when I was trying to run some inspections under the hood because I had wrongly believed that it had somehow sorted itself. Learn from my experience and do not be deceived into believing that a failed hood strut will magically work again without a replacement.
Struts in perfect working condition will have the pressure in their cylinders resist even gravity’s pull on semi-decent roads, if open, and the vehicle driven for any reason. If, for any reason, the hood now comes down before the time you had appointed for it, and then appears to fix this erratic behavior on its own again, you’re better off looking for a replacement soon.

Why Hood Struts Fail
Hood struts are wear-and-tear items, much like the regular struts on your suspension. Accordingly, after a plethora of opening and closing of the hood, the seal fails, and the pressure of the gas in the strut’s chambers is lost as a result of the compromised, aging seal.
With the dropped pressure, the remaining pressure therein struggles to hold up the weight of the hood in positions it did before the challenge.
At this point, you’ll have to support the hood with your hand, a prop stick, or, if it still manages to hold when warmed up, risk having it come slamming on your head, as I have experienced in the past!
Tools and Duration of Changing the Hood Strut on a Lexus ES330
DIY is fun, and the idea of riding in the vehicle you repair yourself is quite intoxicating. However, without tools, at least, basic tools, this process can be a pain in the butt and a major challenge.
This is why it’s very important that this is shared. Outlined below are the tools needed for this task.
Tools
- Small flathead screwdriver.
- A prop stick to help the hood stay in place. I prefer having an assistant hold the hood for me while I perform this (more on this later).
- A replacement hood strut, specific to this model.
Duration
Handling vehicle repair in a DIY fashion is often in phases: from the beginner (at the start, to the intermediate (after a while), to the advanced (after many years of wrenching and improving on the overall business of fixing your vehicle).
These phases actively determine the time it takes to complete a task. For instance, an advanced DIY person may take about 10 minutes to complete a task that will take a beginner over 40 (or more) minutes to complete.
That said, for the absolute beginner DIY person, this task should take 10 minutes max (or, slightly less).
This is a reasonable time to finish an auto DIY task: it should naturally inspire you to take on the task of changing your hood strut, and who knows, sooner than later, other vehicular-related challenges (as they arise in the course of your motoring life).
Skill Level
Not every car repair project can be handled by every DIY person. Sometimes, by the nature of the complexity of the process, it’s extremely difficult or nearly impossible to have some persons on the ‘DIY ladder’ handle some of the challenges that might need attention on a vehicle.
The good part?
This repair/replacement process can be handled by anyone on the DIY ladder, from the absolute beginner to the professional who takes apart engines, fixes them, and reassembles everything back, ensuring the motor fires on its first crank.

How to Change the Hood Strut on a Lexus ES 330, DIY Style
The very first thing to do when you’re interested in getting to change a bad or weak hood strut on your ES 330 (300, Camry, Avalon, or Solara) is to hold the hood in place (with a prop stick, for instance).
Unfortunately, I have a bitter experience with this as the prop stick I attempted to use simply slid off, and if not for the gift of quick reflexes, the hood would have come crashing down on my bald head!
Instead, I found out that getting an assistant to hold the hood in place while I performed this replacement was a much better alternative than getting my head hit by a several-pound weight hood (insider clue: the hood is quite heavy once the struts come out. The weight will rudely shock you).
With the hood issue sorted, the next thing you’ll need to do is pry out the retaining clips around the neck of the old strut with a small flathead screwdriver. Usually, the clip snaps or comes out on the first attempt. However, if it does not, keep on at it; it doesn’t take much to get away with it.
Once one of the retaining clips around the end of the old strut is out, repeat the same process at the other end, effectively taking out the bad strut in its entirety (by pulling away from its attachment points).
Done with the old struts, simply align the new ones at both ends and flush them in, manually. If they are faced the wrong way, play around with the threading and align them facing the right angle before flushing them in by hand.
Test the hood by lowering it halfway and leaving it: it should spring back to its upright, open position, or at the very least, remain in the position it was left at.
Checked?
Congratulations! You just successfully changed the hood struts of your Lexus ES 330. Or, Camry. Or Solara. Or, Avalon.
A Video Depiction of the Process…
A photo, it’s said, is worth a thousand words. In the auto DIY world, a video is worth a billion.
If you’re a visual learner or generally prefer videos, here’s everything the article has said, reduced to one simple-to-understand video.
Enjoy the wrenching process!
Summary
Changing the hood strut on a vehicle, especially a Toyota or Lexus, is a piece of cake or a walk in the park.
It’s also something that is DIY-friendly (and can be done in less than 10 minutes, even on a Monday morning, right before you jump into your vehicle for work).
The good part? Almost zero tools are required: just a small flathead, which you most likely already have.
Good luck with the change, and remember that a clean hood makes such ‘hood-inspired’ works more mentally exciting!
Addendum I
Disposing gas filled struts wrongly could have some challenges both on the environment and the folks who are likely to handle the disposed items.
Before disposing of your old, weak strut, make sure you follow your city’s laws for disposing of such items, and if recycling is indicated, follow the appropriate channels only.
It makes sense to be a responsible citizen at all times, even if it means going out of your way. Remember, the responsibility of the earth belongs to all of us, and importantly, the duty of care we have to each other remains a sacred one.
Addendum II
When I initially changed this hood strut, I had no idea just how easy Toyota has made the process. Since that time, I’ve been fortunate to tackle the same challenge across different makes, models, and years.
The conclusion?
Toyota truly made the process super easy and fun to tackle. And, it isn’t just the struts: most things are easier to handle on a typical Toyota/Lexus than they are on other makes.
This means, if you’re looking to start auto DIY (especially as a beginner), you’re better off starting with a DIY-friendly make, such as a Lexus or a traditional Toyota.
There is an array of options from the line: from plebian ones to top of the line luxury, both in the sedan, sports, and SUV world, in the form of luxury offerings from the associated marque, Lexus.
If you’re not interested in Toyotas, then, at least, keep within the realm of Japanese or Korean marques – and importantly, opt for the less complex models, relying on fewer electronics.
Less, after all, is more – especially in the world of auto DIY, where things can become complex faster than you get to turn a wrench!
Love the Above? Subscribe for More
Throttle Lan
DIY Mechanic and Freelance Auto Writer